
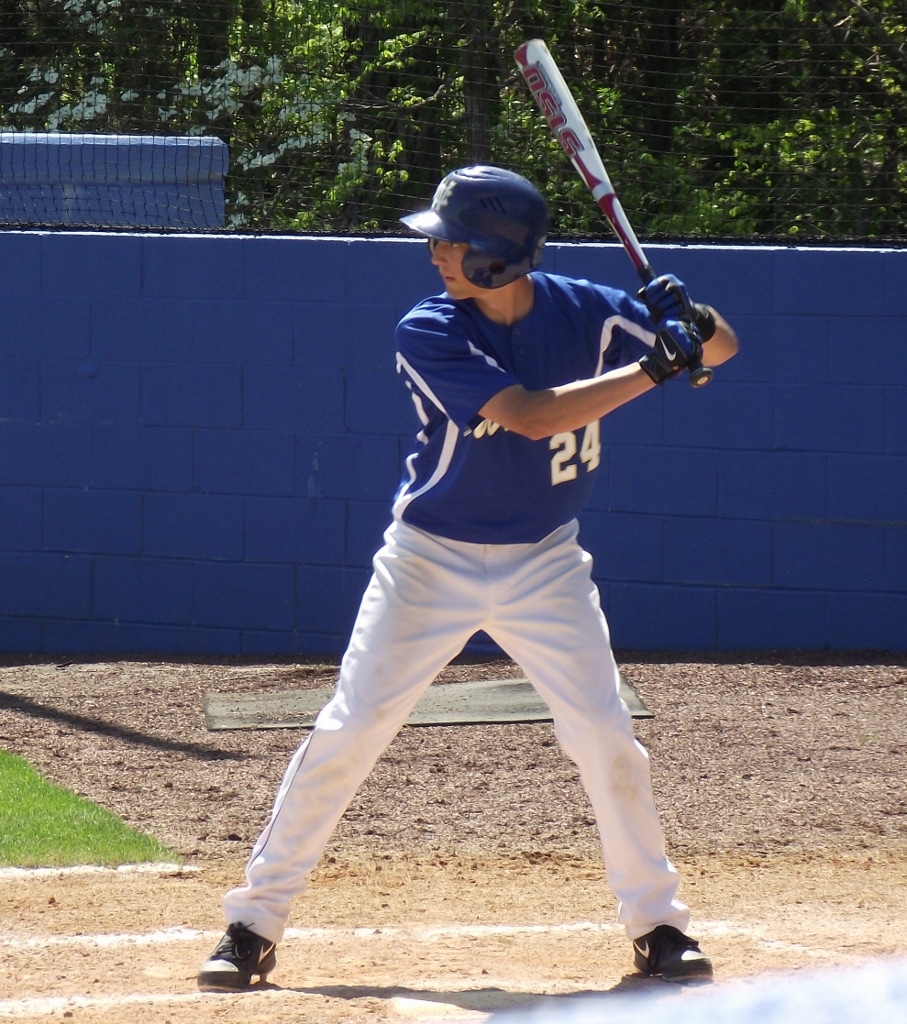
The Batting Stance
Ben Spradley
The youth batting stance
The youth batting stance has changed so much over the last decade or so. It has obviously been influenced by the batting stances of the mlb players. I don't think the change is good for youth batters who try to imitate their favorite mlb player's batting stance. Batters don't hit from the stance, they hit from the load position. But an extreme stance can make getting to the load position very difficult for the youth batter. I prefer to teach my young students a very basic "square" stance in the beginning of our training sessions. As they get older, I give them more freedom to experiment with the stance...until it starts negatively affecting their hitting.
Professional batting stances
Have you seen the many different stances of professional baseball players days? Some are downright humorous to watch. What about Craig Counsell with his arms stretched over his head? And Kevin Youkilis, what is he doing with his hands spread apart? And Jeff Bagwell with the extremely wide feet and knees almost outside of his feet, looks weird. Their extreme stances obviously works for them, but will they work for most young hitters? There is one thing for sure, we don't hit from the stance, we hit from the load position. That is why those guys are so successful from the weird stances. If you study them, you will notice one thing - they all look the same at the load position.
Take a look at someone like Ken Griffey, Jr.'s stance, it's pretty basic. He doesn't hit from the stance either, but when he gets to the position, he looks basically the same as Youkilis, Bagwell, Counsell, and the rest of the guys with weird stances. What makes Griffey different is that he can make the transition into the load position much more smoothly than the others. Why? Because he keeps it simple from the start. The other guys are good hitters, but Griffey is a great hitter. And I think that his greatness starts with his simple stance, nothing fancy, nothing showy. There are no wasted movements from the stance to the load position, just a smooth transition.
Take a look at someone like Ken Griffey, Jr.'s stance, it's pretty basic. He doesn't hit from the stance either, but when he gets to the position, he looks basically the same as Youkilis, Bagwell, Counsell, and the rest of the guys with weird stances. What makes Griffey different is that he can make the transition into the load position much more smoothly than the others. Why? Because he keeps it simple from the start. The other guys are good hitters, but Griffey is a great hitter. And I think that his greatness starts with his simple stance, nothing fancy, nothing showy. There are no wasted movements from the stance to the load position, just a smooth transition.
Let's Talk About The Youth Batting Stance
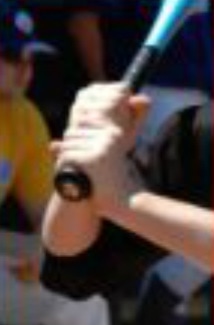
Let's start with the grip
|
The baseball batting grip is one of the most overlooked things in youth baseball. When working with a new student, always start with the grip. The proper grip allows the hands to work together as a single unit, while an improper grip causes the hands to work against themselves. This can really be seen at contact. A hitter will have better bat control and maximum bat speed with a proper grip. An incorrect grip can be spotted from the dugout. The elbows and wrists are good indicators of an improper grip. If the knuckles are not aligned properly the front elbow especially will be too high. This usually happens when
|
the third (the largest) knuckles are aligned. Another indication of an improper grip is when both wrists are "straight" from the back of the hand to the forearm. I like to see a slight "V" formed at the back of the wrists. This slight "V" along with the front and back elbows at about a 45 degree angle is a pretty good indication that the batter has a proper grip.
Many youth hitters will choke the bat in the palm which doesn't allow them to be in a strong position at contact. Start by holding the bat in the fingers not in the palm of the hand. The fingers should grip the bat in a relaxed manner in the stance. Don't worry about the batter throwing the bat. When the batter starts the swing, the fingers will grip the bat more firmly to keep from throwing the bat.
The grip should be with the "door knocking" knuckles aligned. This will help the hands to work together at contact. This grip should be taught to youth hitters early. Many youth hitters will have the second knuckles aligned with the third knuckles and even the third knuckles together (this is pretty extreme). I know that many big-leaugers will have their second and third knuckles together, but notice the knuckles at contact, the second knuckles ("door knocking") are aligned. The reason for this is because they don't have a "death grip" on the bat, and their knuckles align themselves during the swing. Many youth hitters will grip the bat so tight that their knuckles could never get aligned in this manner.
How to position the feet
I believe the feet are the foundation of the stance. When I start building a youth batter's stance, I make sure the feet are properly placed
Different types of stances: square, open & closed
Positioning the body
Where to place the hands
Elbows up or down
Angle of the bat
The head and eyes
A few tips about the stance
 Mitch Pehlam |
I try to keep it simple when I teach the stance to young hitters. Start with the feet a little wider than shoulders. Good balance is important and I believe that when the feet are too narrow, the balance is not as good. Also, have some flex in the knees which helps with balance as well. The upper body should be bent slightly forward at the waist, keeping the weight on the "balls" of the feet and not the heels. Keep the shoulders either level or the front shoulder slightly lower than the back shoulder. The head should be straight ahead with the eyes level to the pitcher. The hitter should be able to see the pitcher with both eyes comfortably. Lastly, place the hands no lower than
|
the top of the strike zone, and to the back of the back shoulder. This is a strong, basic position for a young hitter.
Positioning In The Batter's Box
Front, middle or back of the batter's box
How close to the plate
Positioning In The Batter's Box
A. Front, Middle, or Back?
1. Advantages and Disadvantages of each.
B. How Close to the Plate?
1. Using the double-tee drill to determine.
A. Front, Middle, or Back?
1. Advantages and Disadvantages of each.
B. How Close to the Plate?
1. Using the double-tee drill to determine.
Outline
A. Positioning The Feet
1. Wider than shoulders.
2. Parallel to the plate (feet straight ahead).
3. Weight on balls of feet.
4. Square Stance instead of Open or Closed for the Little Leaguer.
1. Wider than shoulders.
2. Parallel to the plate (feet straight ahead).
3. Weight on balls of feet.
4. Square Stance instead of Open or Closed for the Little Leaguer.
B. Square, Open or Closed
1. Square (preferred)
a. Easier to stride towards the pitcher.
b. Allows the hips to release freely.
c. Helps keep front shoulder from opening prematurely.
d. Don't have to strain to see the pitcher with both eyes.
2. Open (not preferred)
a. Hips and shoulders are prematurely opened.
b. More likely to cause an "open" stride.
3. Closed (not preferred)
a. Hips and shoulders are too "closed".
b. More difficult to see pitcher with "both" eyes.
c. More likely to cause a "closed" stride, restricting the hip turn.
C. Positioning The Body
1. Knees bent and "inside" the feet.
2. Upper body slightly bent over towards the plate.
3. Weight distributed to approximately 60% on the back leg.
4. Front shoulder square or slightly closed to the pitcher.
5. Shoulders level or front shoulder slightly lower than right shoulder.
6. Feet square to the pitcher.
D. Positioning The Hands (Basic Positioning)
1. Bottom hand no lower than the top of strike zone.
2. Not too close or far away from the body.
3. Place hands at the back of the back shoulder.
1. Bottom hand no lower than the top of strike zone.
2. Not too close or far away from the body.
3. Place hands at the back of the back shoulder.
E. Positioning The Elbows
1. Front elbow should be tucked fairly close to the body.
2. A good starting point for the back elbow is approximately 45 degrees
1. Front elbow should be tucked fairly close to the body.
2. A good starting point for the back elbow is approximately 45 degrees
F. Positioning The Bat
1. A good starting point is 45 degrees above and behind the head and adjust from there.
1. A good starting point is 45 degrees above and behind the head and adjust from there.
G. The Head & Eyes
1. Chin above front shoulder, not on it.
2. The head should be kept straight and turned completely towards the pitcher.
3. Eyes should be parallel (level) to the ground.
4. Should be able to see the pitcher comfortably with both eyes.
1. Chin above front shoulder, not on it.
2. The head should be kept straight and turned completely towards the pitcher.
3. Eyes should be parallel (level) to the ground.
4. Should be able to see the pitcher comfortably with both eyes.
JEC Baseball Info recieves a small commission from any product that you purchase from our affiliates, when you click through the links provided on this site. I like using this model because it doesn't add any extra costs or fees to your purchases. The commission helps to offset the time and cost of maintaining and supporting the site. Thanks for visiting this page.
Home | About | Hitting Fundamentals | Students | Articles | Product Recommndations | Affiliates | Fun Stuff
By using this website, you agree to the Privacy Policy, and Disclosure.
Clidk here to read how to Support This Site at no additional cost to you!
JEC Baseball Info
